OAuth 2.0
OAuth 2.0 is a protocol that lets your app request authorization to private details in a user’s YumiSign account without getting their password.
Your app asks for specific permission scopes and is rewarded with access tokens upon a user’s approval.
You’ll need to register your app before getting started. A registered app is assigned a unique Client ID and Client Secret which will be used in the OAuth flow. The Client Secret should not be shared.
The OAuth Flow
YumiSign uses OAuth 2.0’s authorization code grant flow to issue access tokens on behalf of users.
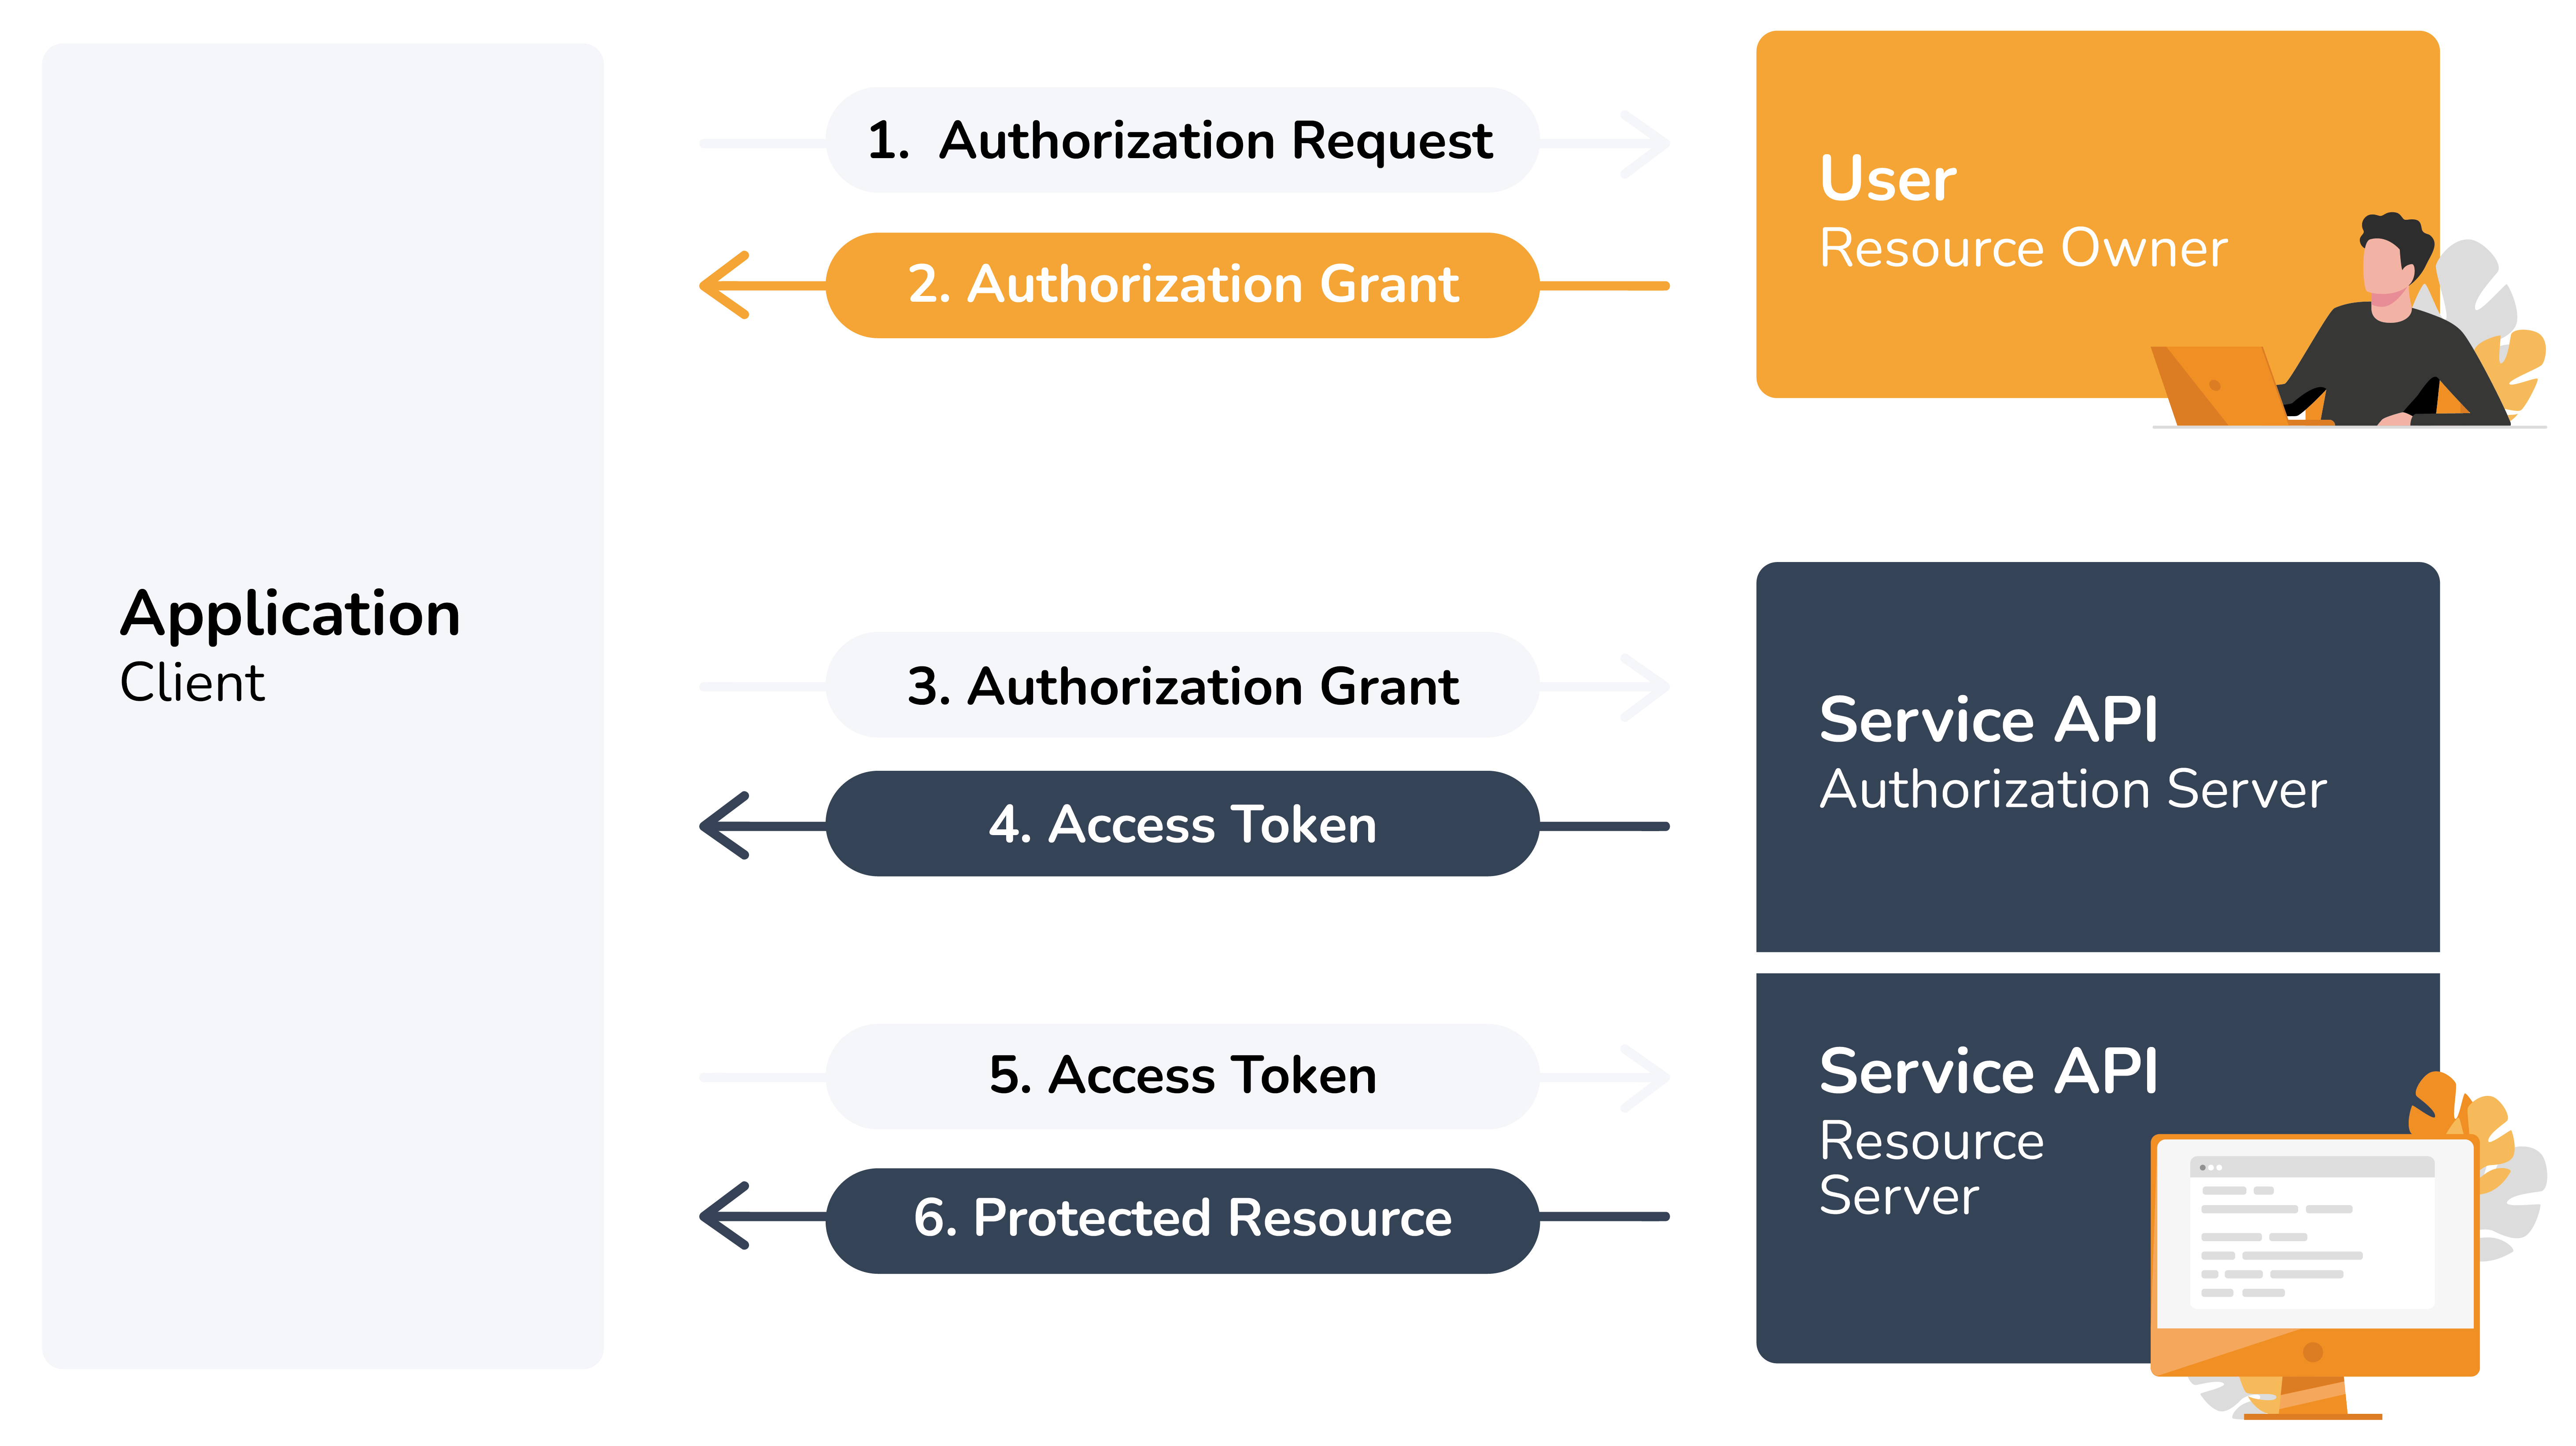
The OAuth flow is your key to unlocking access tokens. There’s no path to programatically create (or retrieve) app access tokens without a user’s input.
Create your integration app
First, you need to login to your YumiSign account, then you go to your manage account, under the Developers section you will be able to manage everything related to your App in the integration app tab.
To create a new integration App you can do that by click on the + button
Step 1 - Sending users to authorize
Your web or mobile app should redirect users to the following URL:
https://app.yumisign.com/integration-apps/authorize
The following values should be passed as GET parameters:
- client_id - issued when you created your app (required)
- scope - permissions to request (required)
- redirect_uri - URL to redirect back to (required)
- state - unique string to be passed back upon completion
- response_type - one of supported response type (“code”) (required)
The scope parameter is a space-separated list of OAuth scopes, indicating which parts of the YumiSign user’s account you’d like your app to be able to access. The state parameter should be used to avoid forgery attacks by passing in a value that’s unique to the user you’re authenticating and checking it when auth completes. Redirect URLs and URIs must use HTTPS.
Step 2 - Users are redirected to your server with a verification code
If the user authorizes your app, YumiSign will redirect back to your specified redirect_uri with a temporary code in a code GET parameter, as well as a state parameter if you provided one in the previous step. If the states do not match, the request may have been created by a third party and you should abort the process.
Authorization codes may only be exchanged once and expire 10 minutes after issuance.
Step 3 - Exchanging a verification code for an access token
If all is well, exchange the authorization code for an access token using the following URL:
https://app.yumisign.com/api/v1/OAuth/v2/access
client_id - issued when you created your app (required) client_secret - issued when you created your app (required) code - a temporary authorization code (required) redirect_uri - must match the originally submitted URI
You’ll receive a JSON response containing an accessToken and refreshToken
curl --location --request POST 'https://app.yumisign.com/api/v1/OAuth/v2/access' \
--header 'Content-Type: application/json' \
--data-raw '{
    "client_id": "c22f0ae73076b96c",
    "client_secret": "ae8e1e9db4ba30c2a6af7aef0cc72e73",
    "redirect_uri": "https://redirectUrl",
    "code": 79386728,
    "grant_type": "code"
}'
{
    "access_token": "eyJhbGciOiJIUzI1NiIsInR5cCI6IkpXVCJ9.eyJzdWIiOiIxMjM0NTY3ODkwIiwibmFtZSI6IkpvaG4gRG9lIiwiaWF0IjoxNTE2MjM5MDIyfQ.SflKxwRJSMeKKF2QT4fwpMeJf36POk6yJV_adQssw5c",
    "refresh_token": "9695d2681cb789918c97f6cfa5f71f9bbebce36aba1c4646f92b710ba075c79b2dccfd1e8a306a10c142ff397bfc95c08096813303020ec9a3007b86e0172c58"
}
Access tokens for all apps are also known as bearer tokens.
You can then use this token to call API methods on behalf of the user. The token will continue functioning until it’s expired.
Step 4 - Exchanging refresh token for a new access token
When ever your access token expires, you can refresh it using the following URL:
https://app.yumisign.com/api/v1/OAuth/v2/refresh
Refresh Token will be used to create a new access token each time it expires, The refresh token will continue functioning until the installing user either revokes the token and/or uninstalls your application.
curl --location --request POST 'https://localhost:8443/api/v1/OAuth/v2/refresh' \
--header 'Content-Type: application/json' \
--data-raw '{
    "refresh_token":"9695d2681cb789918c97f6cfa5f71f9bbebce36aba1c4646f92b710ba075c79b2dccfd1e8a306a10c142ff397bfc95c08096813303020ec9a3007b86e0172c58",
    "client_id": "c2290ae7f76b306c",
    "client_secret": "aea30f7a8e1e9db4bef0cc7c2a6a2e73"
}'
{
    "access_token": "eyJhbGciOiJIUzI1NiIsInR5cCI6IkpXVCJ9.eyJzdWIiOiIxMjM0NTY3ODkwIiwibmFtZSI6IkpvaG4gRG9lIiwiaWF0IjoxNTE2MjM5MDIyfQ.SflKxwRJSMeKKF2QT4fwpMeJf36POk6yJV_adQssw5c"
}
Denied requests
If the user denies your request, YumiSign redirects back to your redirect_uri with an error parameter.
[redirect_uri]?error=access_denied
Applications should handle this condition appropriately.
Storing tokens and credentials
Store your application’s credentials and user tokens with care.
Using access tokens
The tokens awarded to your app can be used in requests to the Web API. When you are communicating with our web api, simply you need to present the bearer tokens in your request’s Authorization HTTP header:
GET /api/v1/profile/actions?limits=10000
Authorization: Bearer xoxb-1234-abcdefgh